Joysticks let you control complex poses and deformations with a single handle. Use them to combine multiple animated properties into reusable controls, such as moving a character’s eyes and head together.Each joystick axis controls the playback position of an assigned timeline. Moving the handle scrubs through those timelines, and you can key its position to animate the resulting poses.
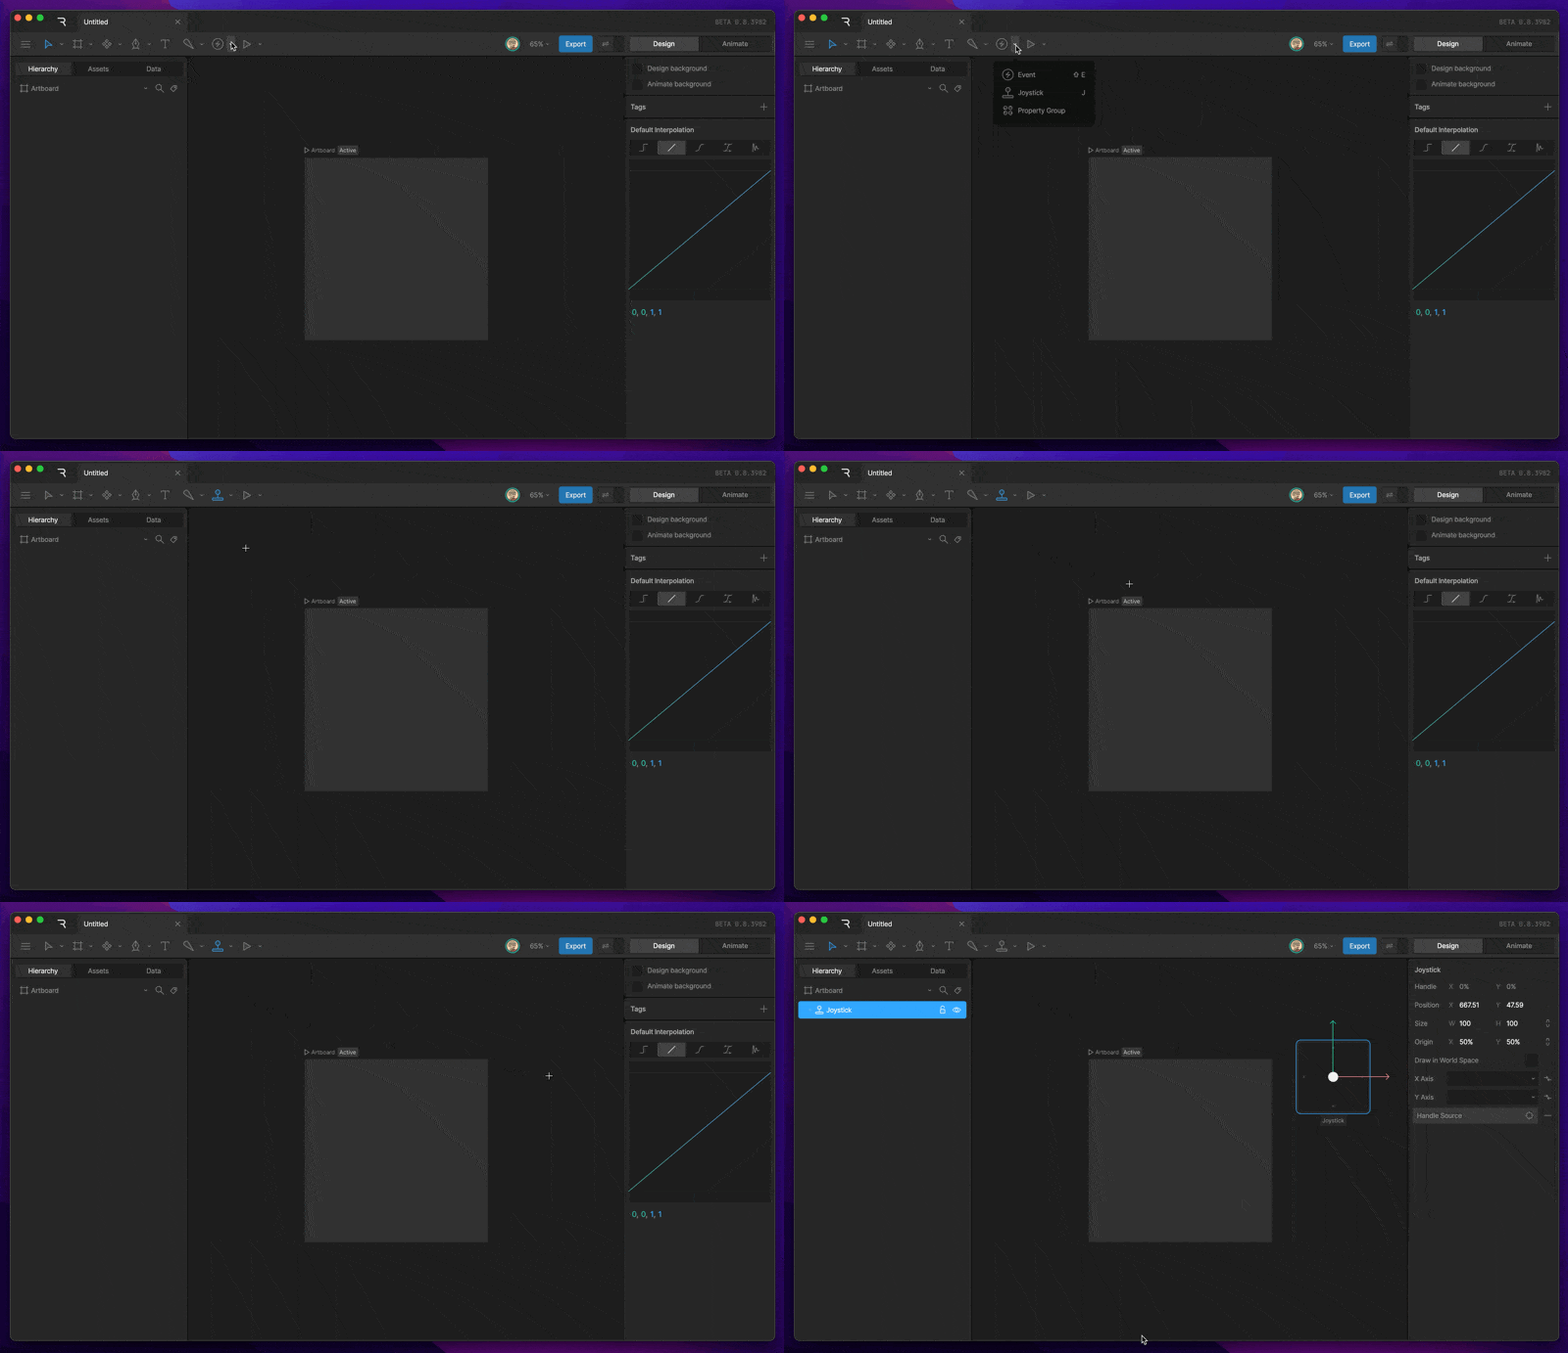
To create a new joystick, either find the Joystick Tool in the Stage Controls Tool menu, or by hitting the J key. Once the tool is activated, click anywhere on the stage to add a new Joystick.
If joysticks aren’t visible on the stage, open the View Options menu and make sure Joysticks is enabled.
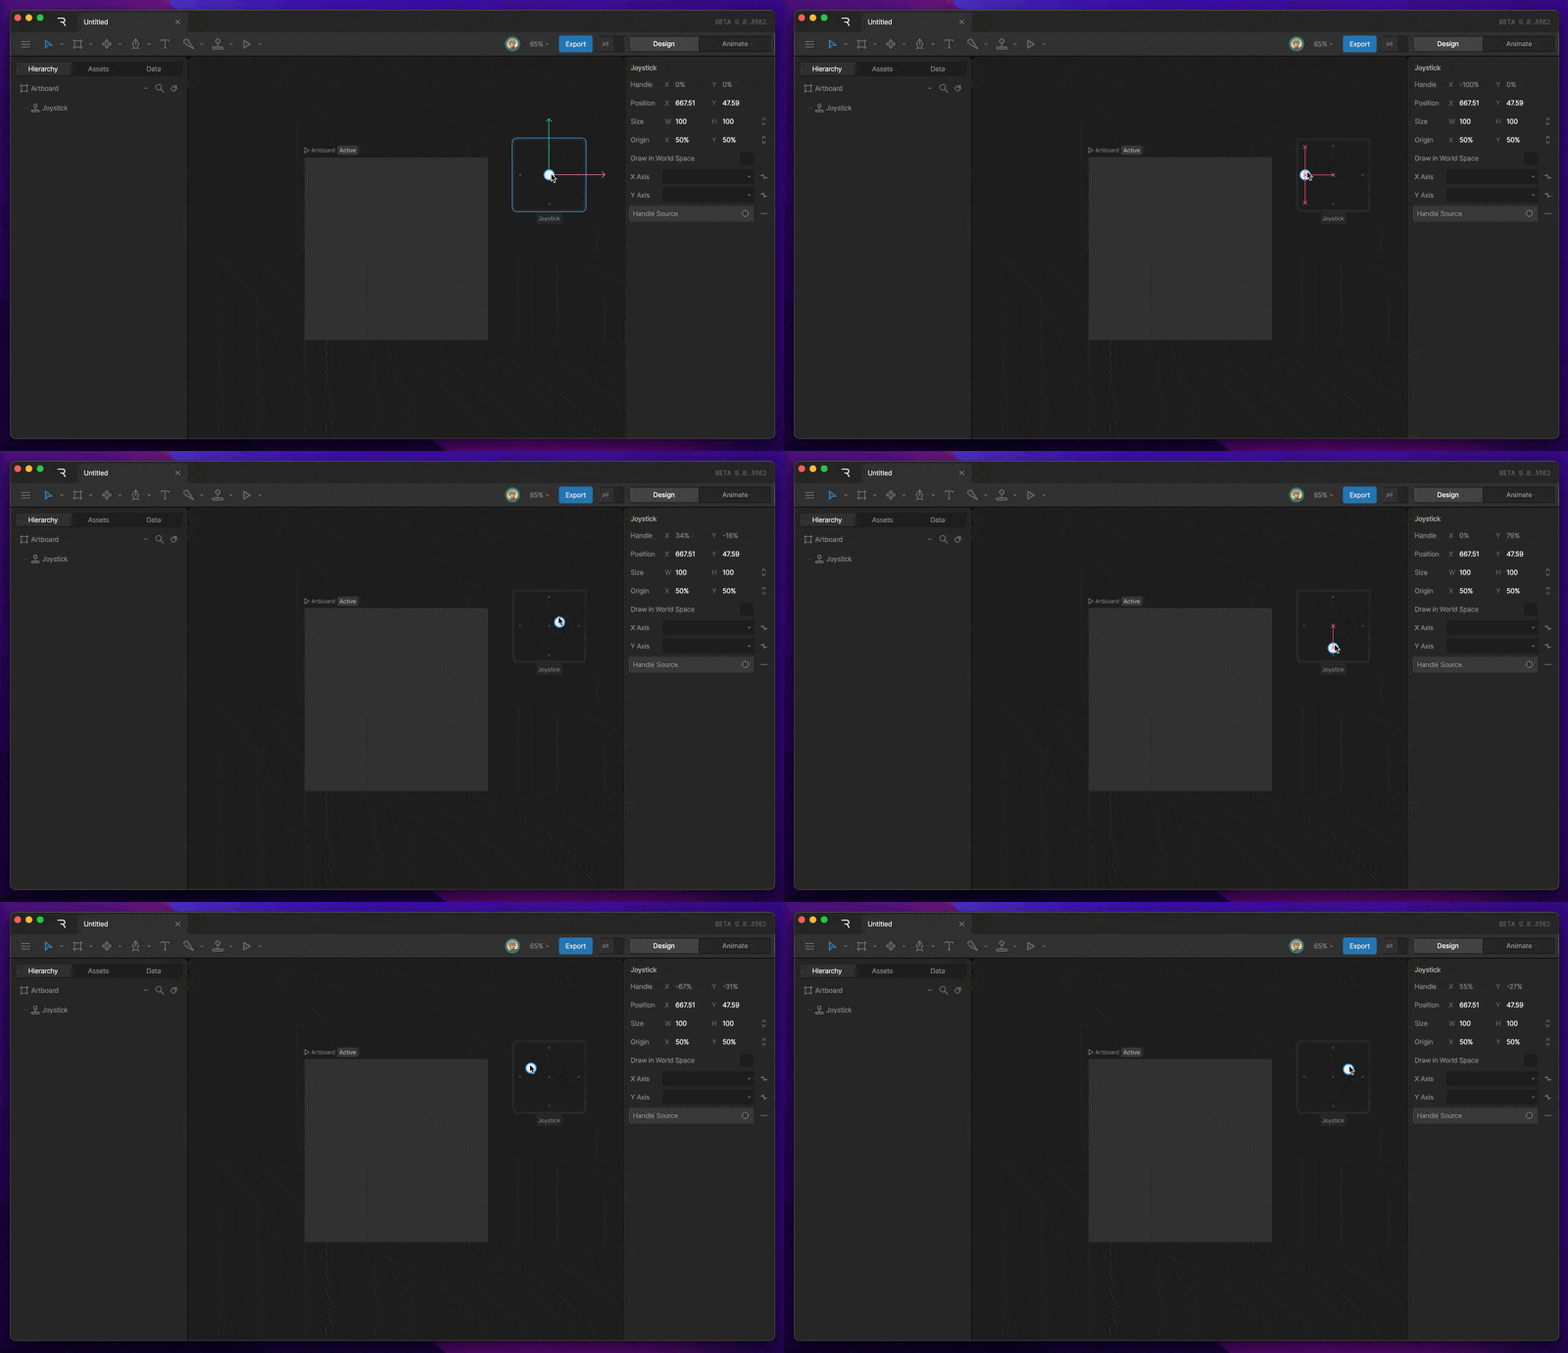
The Handle X and Y property describes the position that the handle is currently in. You’ll notice that these properties update as you move the handle around the Joystick.
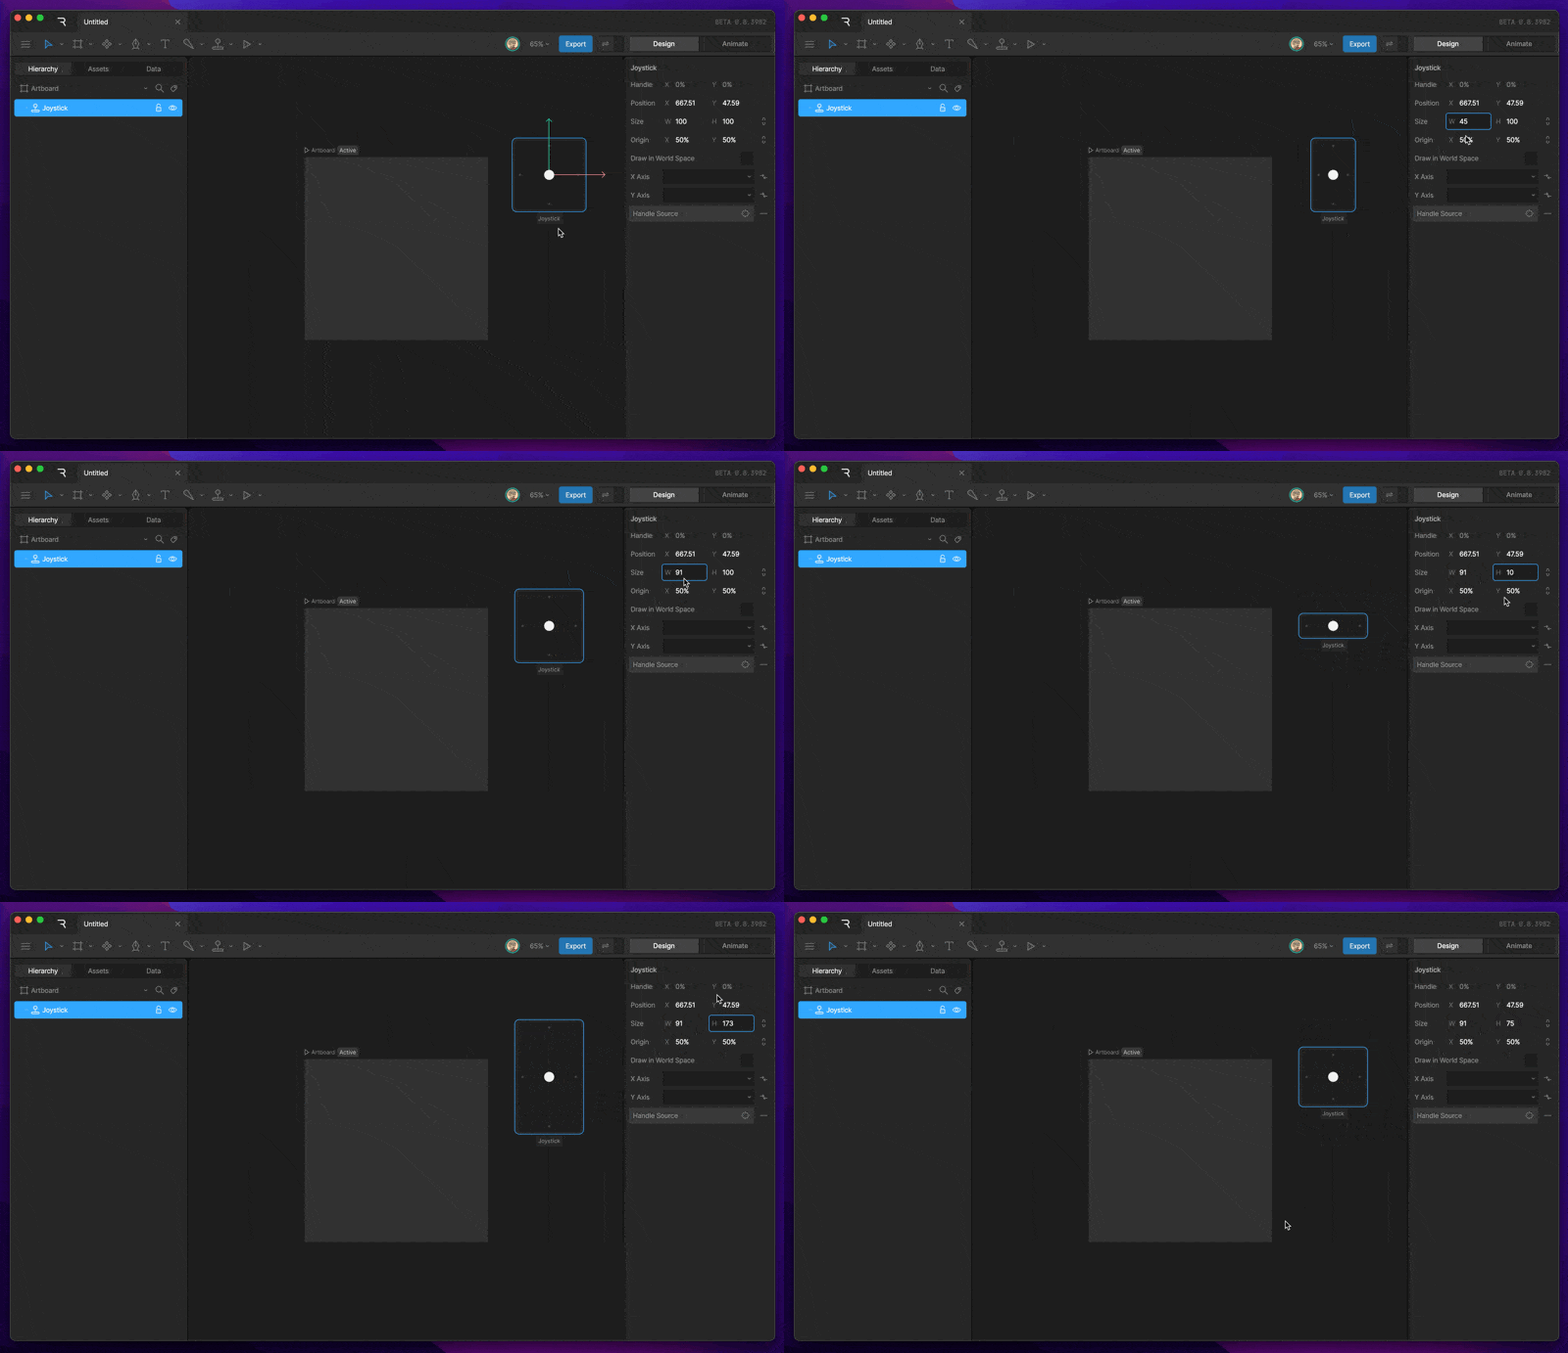
The size property describes the size of the joystick. We can modify this property to fit our needs by making the joystick longer/shorter or wider/skinnier.
The origin property sets which point of the joystick sits at its position. Values are relative to the joystick’s size: 0, 0 is the top-left corner, 1, 1 is the bottom-right corner, and the default 0.5, 0.5 is the center.Changing the origin moves the joystick’s bounds around its position without changing how the handle maps to the assigned timelines. For example, set the origin to 0, 0.5 to make a slider extend to the right of its position instead of centering on it.
This toggle tells the joystick whether the joystick will scale with the zoom level or not. This option is useful when we need the joystick to always stay the same size, relative to the artboard.
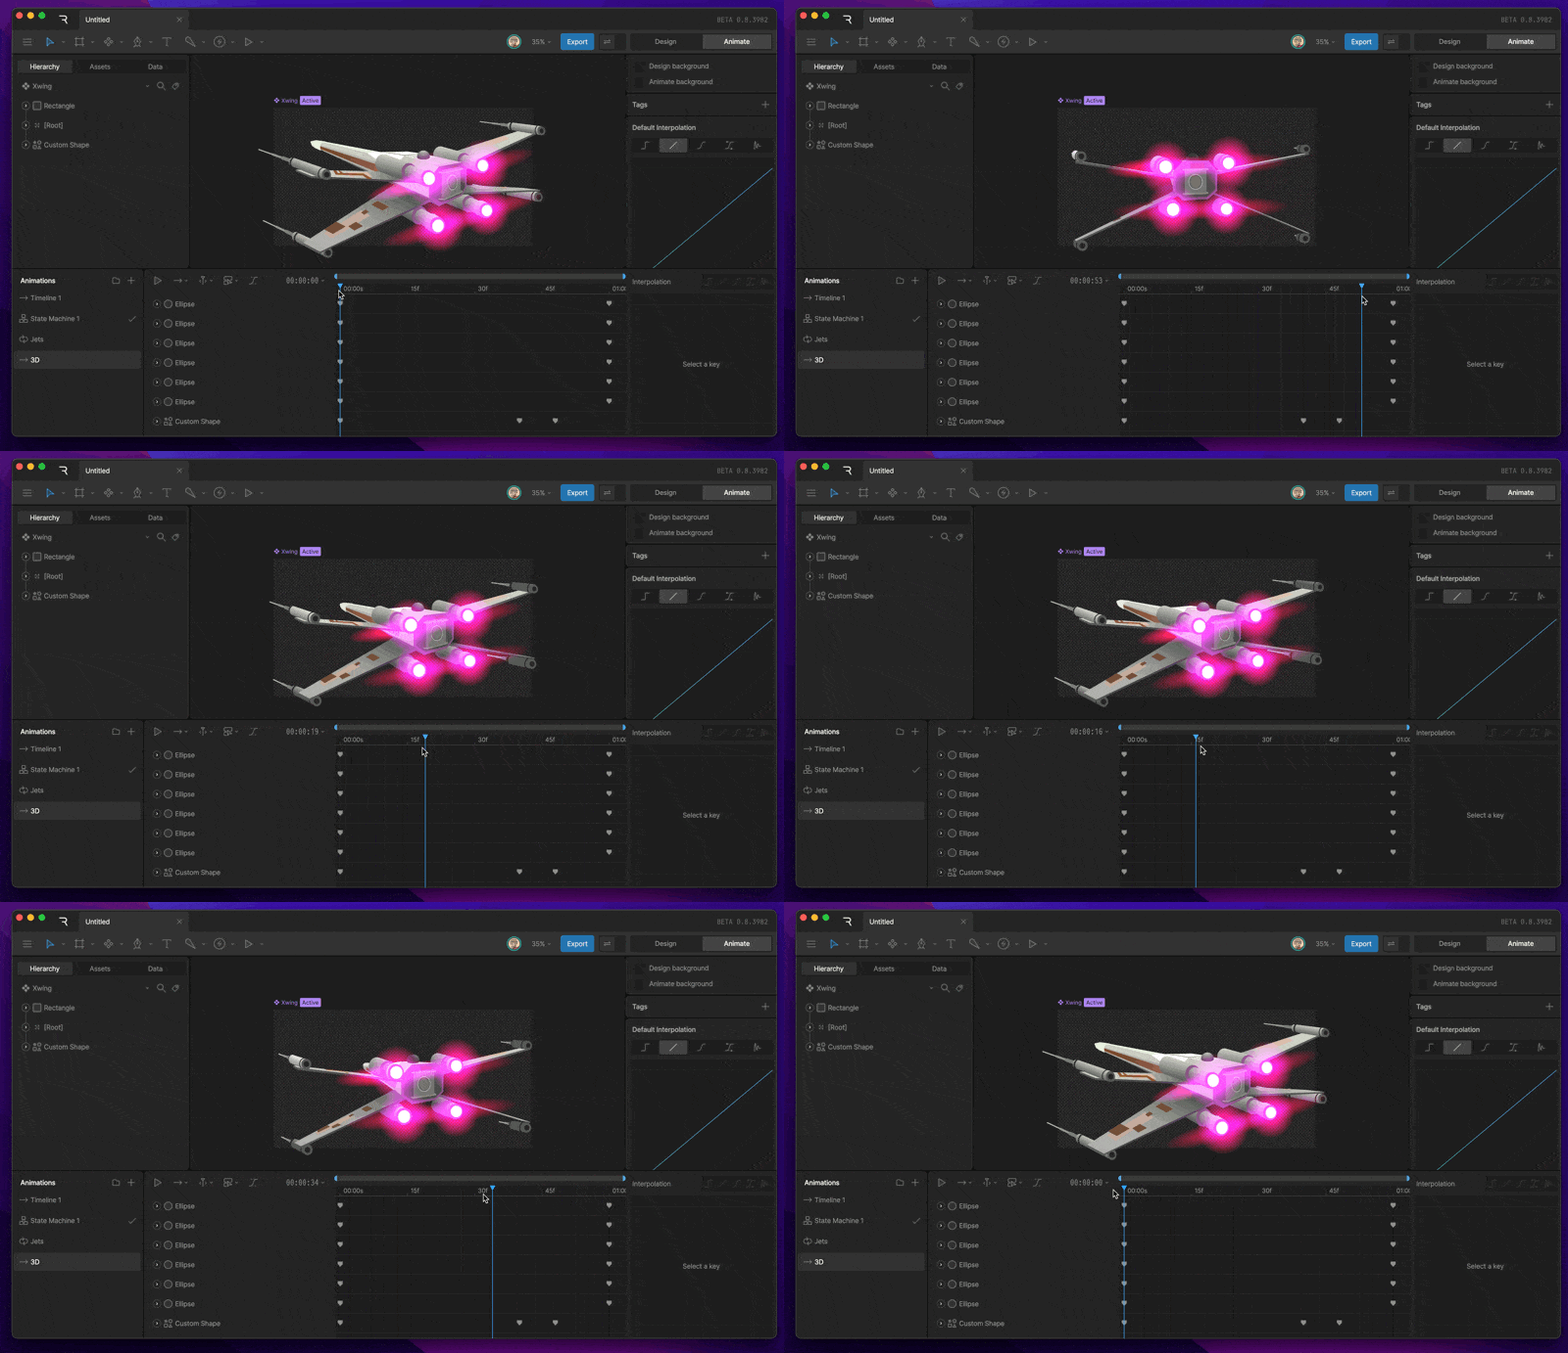
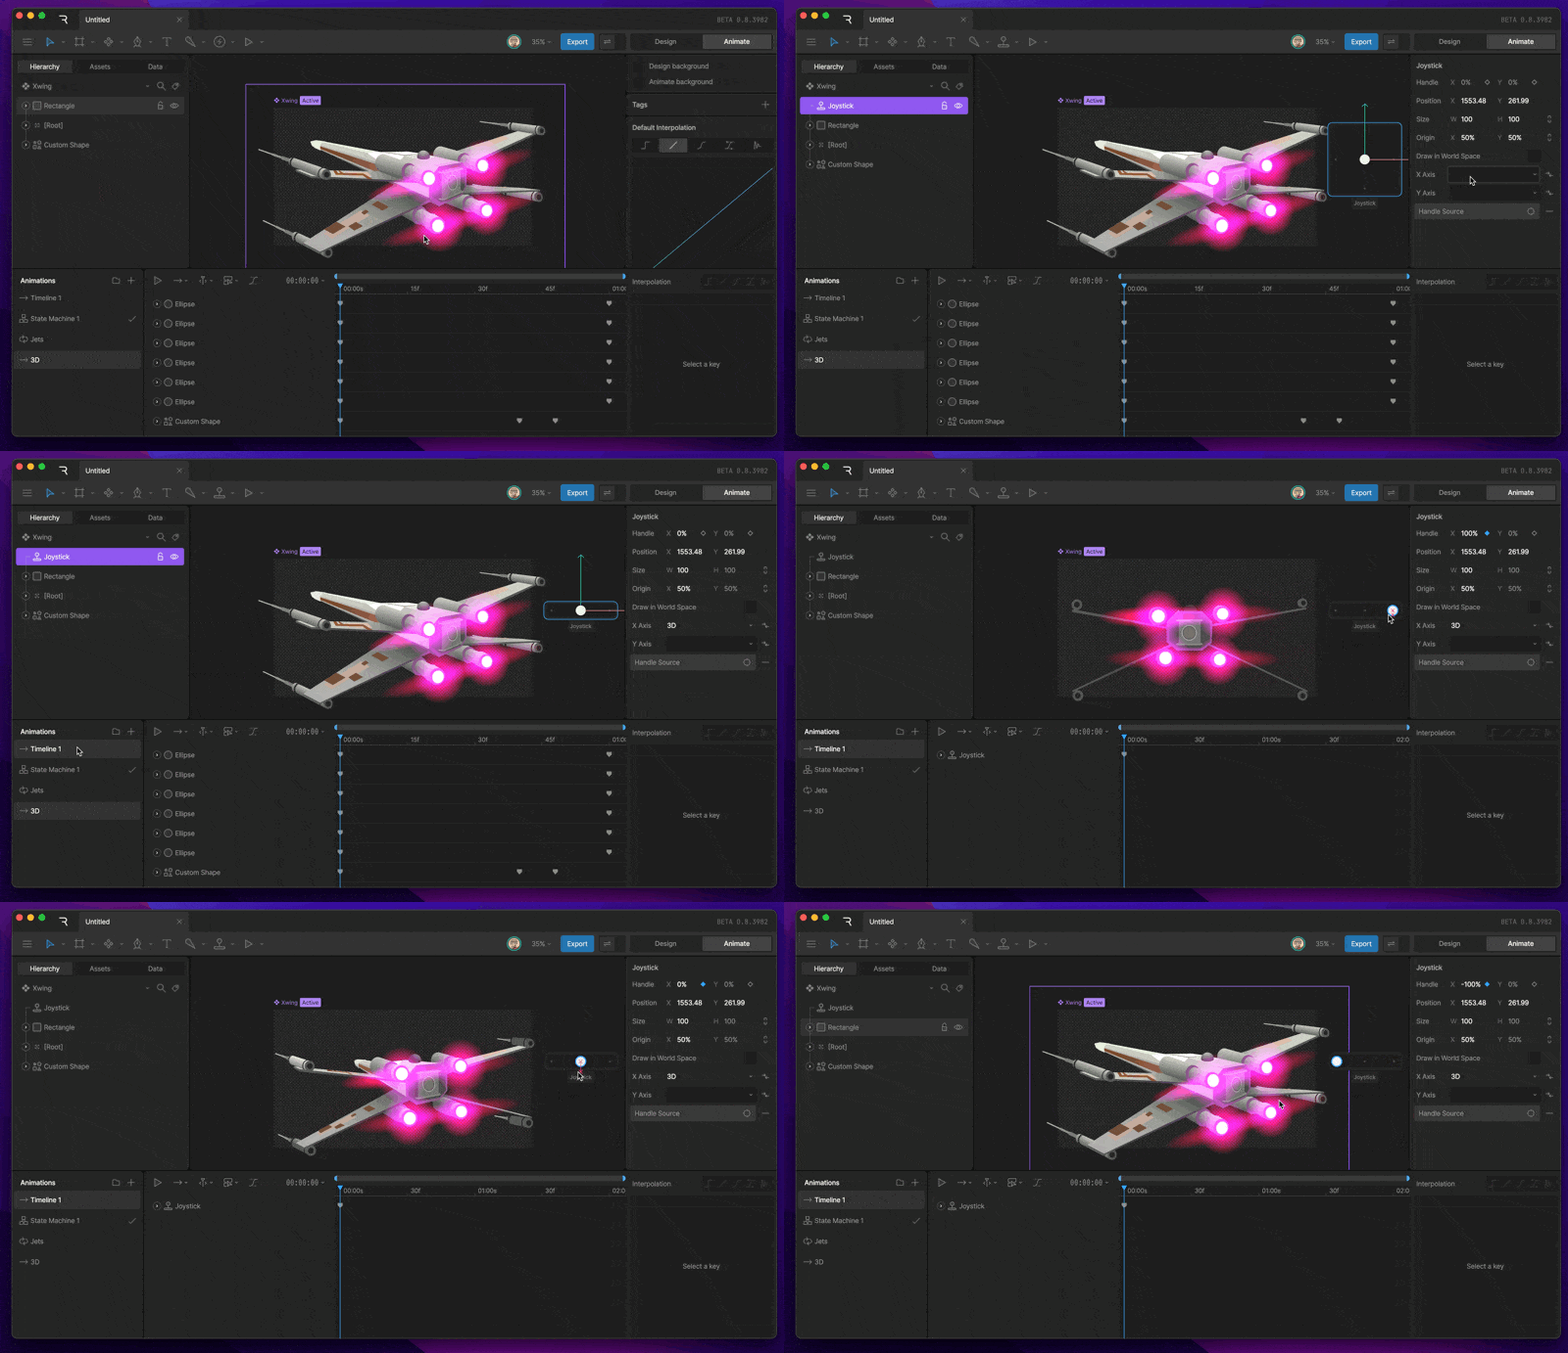
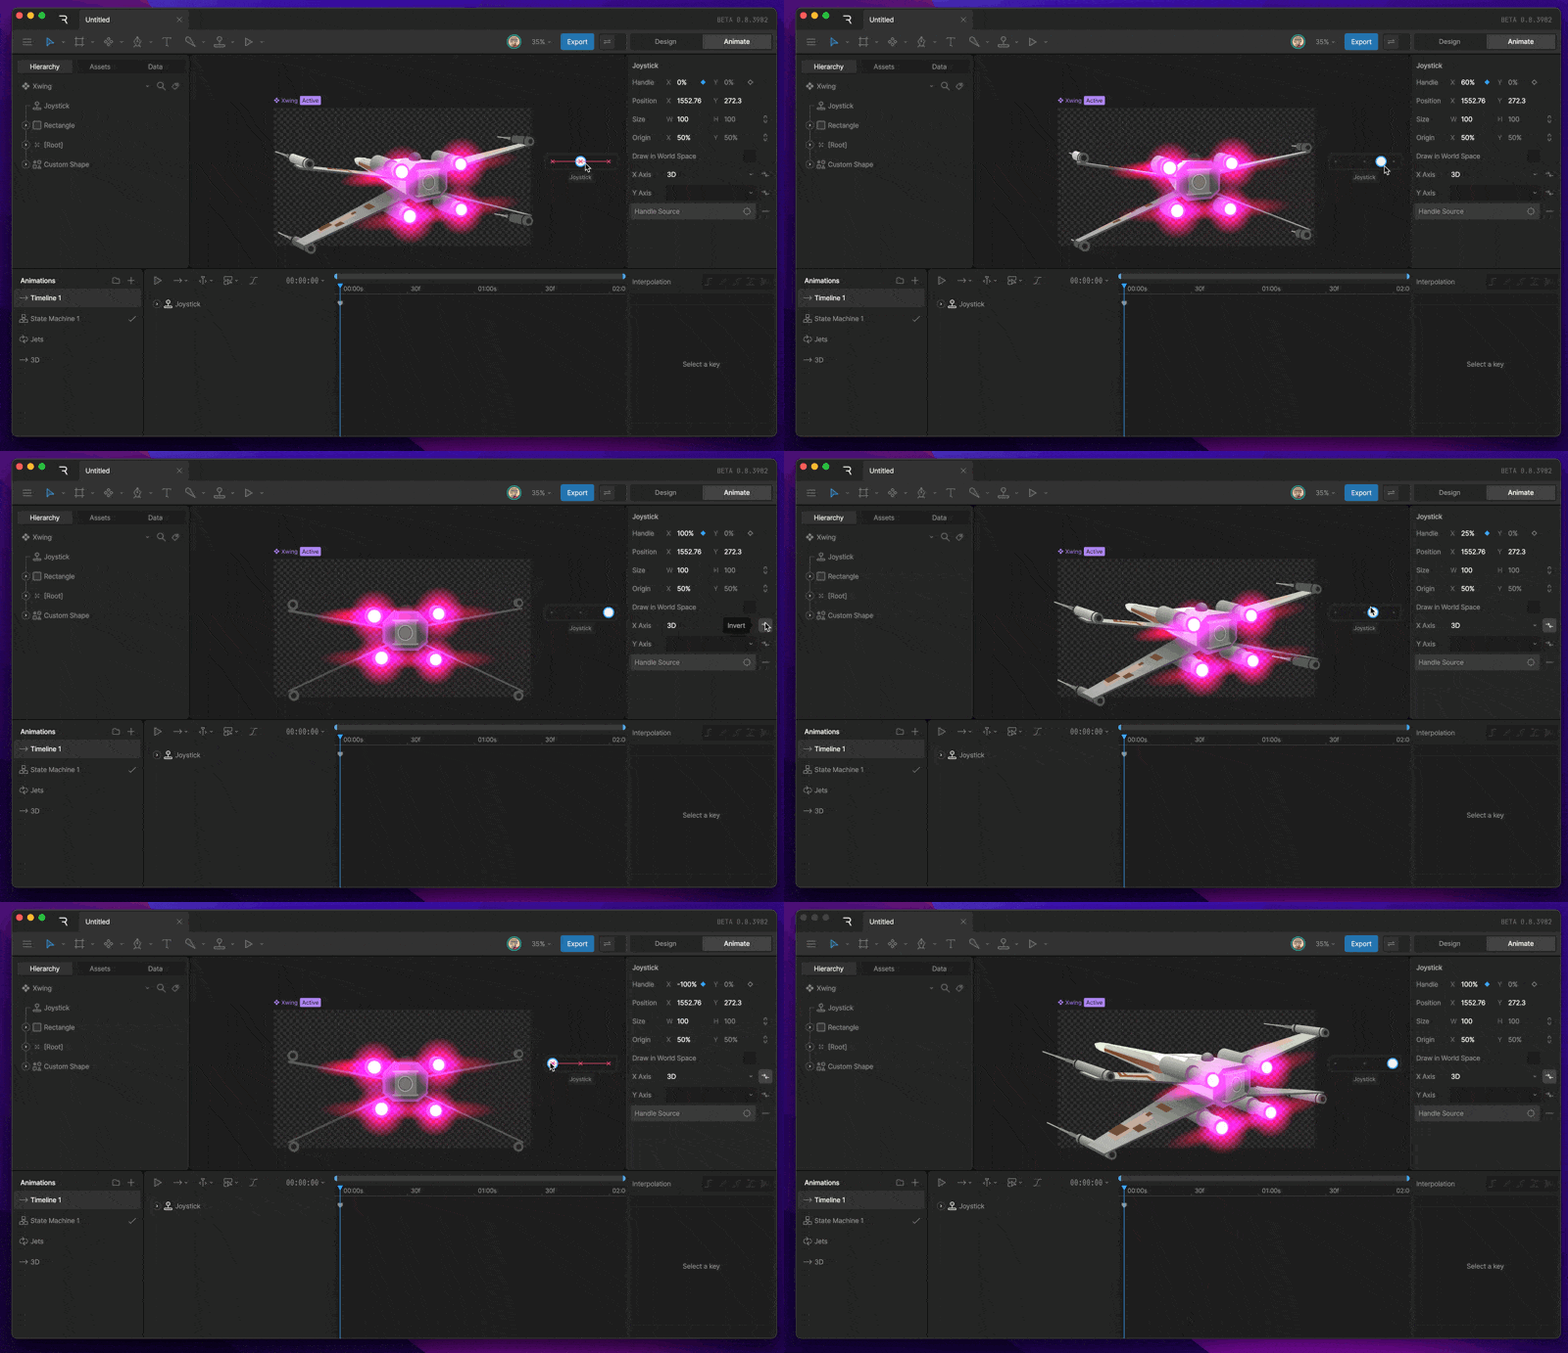
The X & Y dropdowns allow us to assign timelines to the different axis of the Joystick.For example, this timeline animates the 3D rotation of this ship. You’ll notice many keys, which would make reusing this animation within other animations tricky to achieve.When the timeline is assigned to the X axis of the Joystick, notice that the joystick becomes a slider that only allows you to move the handle in the X direction.Invert ToggleAfter you add a timeline to an axis, you’ll notice a toggle that appears next to it. This allows you to invert the direction that the joystick scrubs through the timeline.
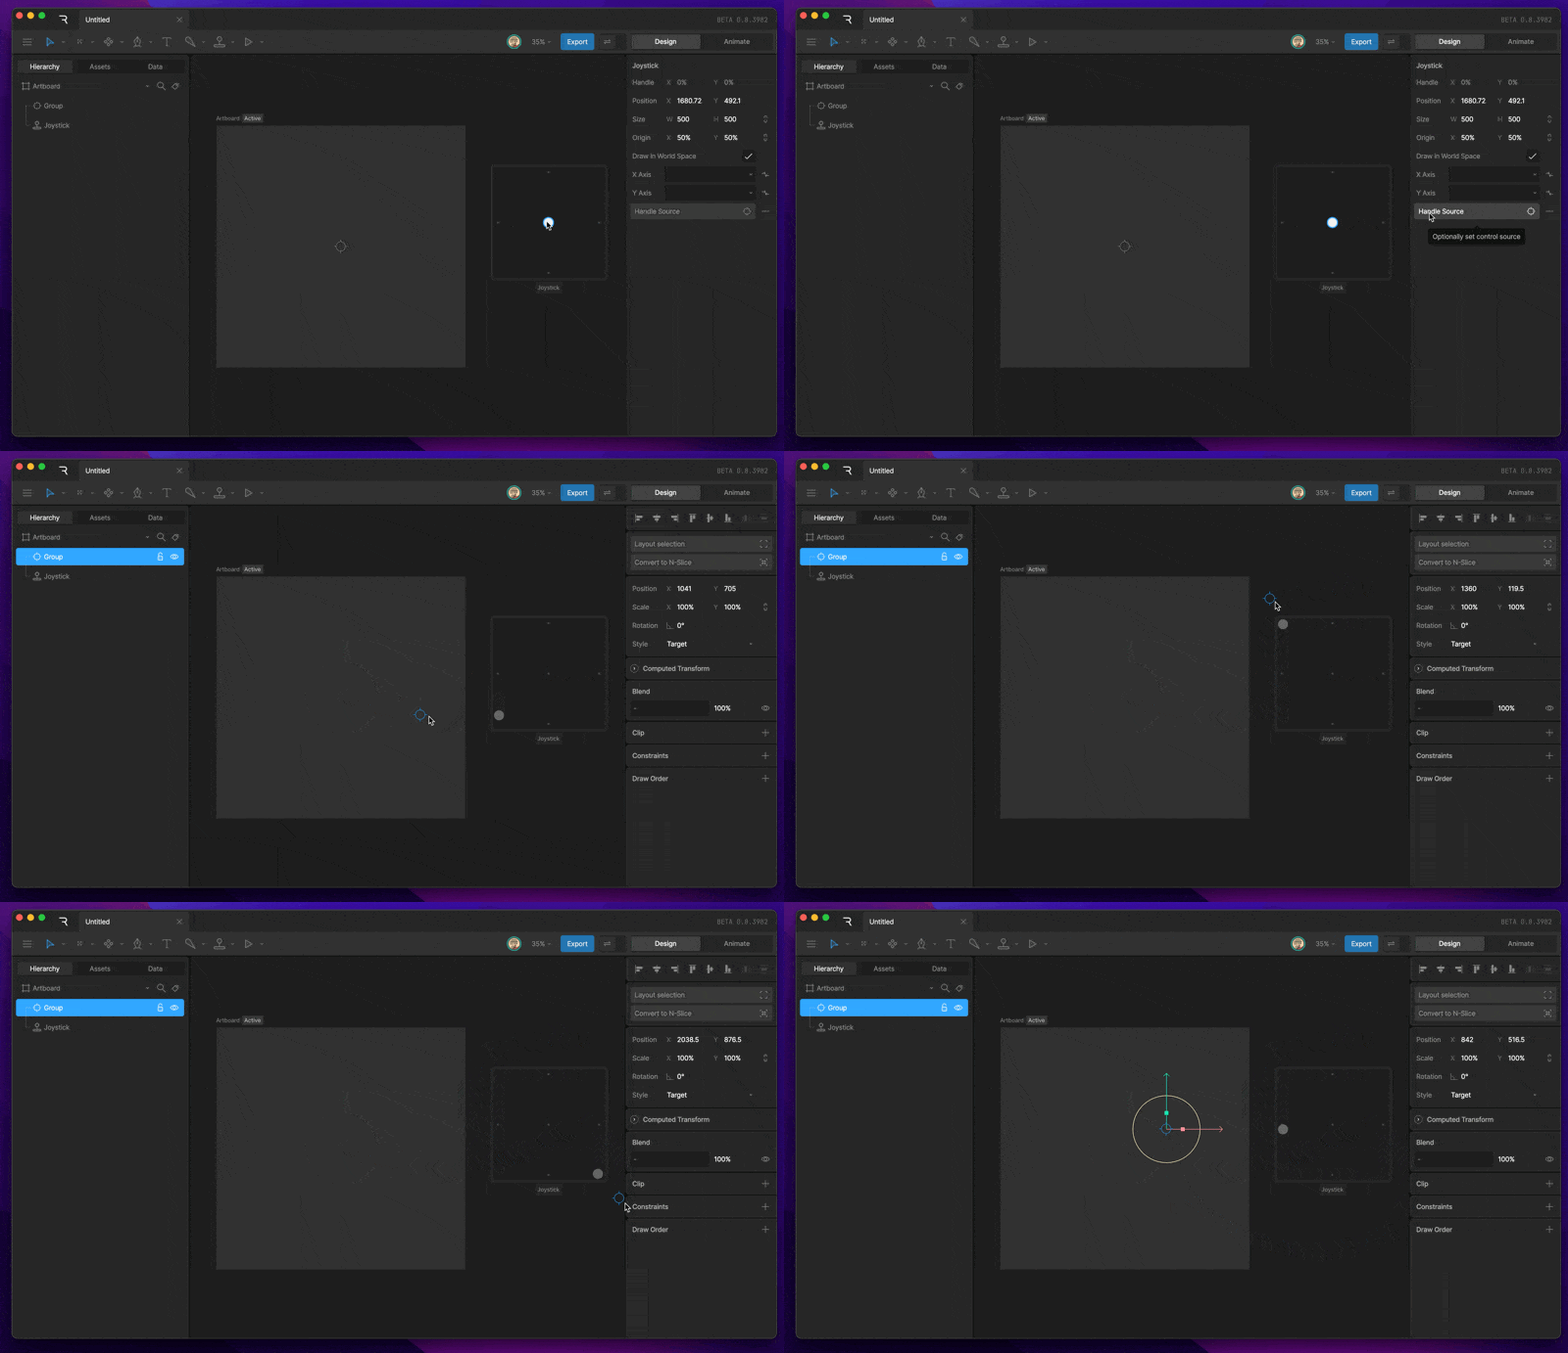
The handle source allows you to constrain the position of the handle to another object’s position properties. Use the button, then select an object you’d like to use as the handle’s position source. This option is helpful when you want the mouse cursor to drive the joystick while the state machine is running.
{"docsConfig":{"theme":"mint","$schema":"https://mintlify.com/docs.json","name":"Rive","colors":{"primary":"#ffa41c","light":"#ffa41c","dark":"#ffa41c"},"logo":{"light":"https://mintcdn.com/rive/tBktbqSaEr9ZwywZ/logo/rive_top_logo_black.svg?fit=max\u0026auto=format\u0026n=tBktbqSaEr9ZwywZ\u0026q=85\u0026s=e09b8659935986a837947ae7c3b104e0","dark":"https://mintcdn.com/rive/tBktbqSaEr9ZwywZ/logo/rive_top_logo_white.svg?fit=max\u0026auto=format\u0026n=tBktbqSaEr9ZwywZ\u0026q=85\u0026s=d2ccc2c4dec459d584f578475de89248","href":"https://rive.app?utm_source=docs\u0026utm_medium=header_nav"},"favicon":"https://mintcdn.com/rive/IGEy4oJSivuQmjey/favicon_black.png?fit=max\u0026auto=format\u0026n=IGEy4oJSivuQmjey\u0026q=85\u0026s=986c81e5b82e1138420d773296030a3a","appearance":{"default":"dark"},"background":{"decoration":"grid"},"navbar":{"links":[{"href":"/tutorials/learn-rive","label":"Learn"},{"href":"/community/support","label":"Support"}],"primary":{"type":"button","label":"Get Rive","href":"https://rive.app/downloads?utm_source=docs\u0026utm_medium=header_nav"}},"footer":{"socials":{"youtube":"https://www.youtube.com/channel/UCPal2R1FxwRTPylhP_7ofEg","x":"https://twitter.com/rive_app","instagram":"https://www.instagram.com/rive.app","github":"https://github.com/rive-app","discord":"https://discord.gg/rive-app"},"links":[{"header":"Resources","items":[{"label":"Community","href":"https://community.rive.app?utm_source=docs\u0026utm_medium=footer_nav"},{"label":"Blog","href":"https://rive.app/blog?utm_source=docs\u0026utm_medium=footer_nav"},{"label":"Case Studies","href":"https://rive.app/blog/case-studies?utm_source=docs\u0026utm_medium=footer_nav"},{"label":"Marketplace","href":"https://rive.app/marketplace?utm_source=docs\u0026utm_medium=footer_nav"},{"label":"Feature Requests","href":"https://community.rive.app/c/feature-requests"}]},{"header":"Company","items":[{"label":"Careers","href":"https://rive.app/careers?utm_source=docs\u0026utm_medium=footer_nav"},{"label":"Terms of Service","href":"/docs/legal/terms-of-service"},{"label":"Acceptable Use Policy","href":"/docs/legal/acceptable-use-policy"},{"label":"Privacy Policy","href":"/docs/legal/privacy-policy"},{"label":"Your Privacy Choices","href":"https://rive.app/?cookie-settings"}]}]},"fonts":{"heading":{"family":"Tomorrow Placeholder","weight":500,"source":"https://framerusercontent.com/assets/nCpxWS6DaPlPe0lHzStXAPCo3lw.woff2","format":"woff2"}},"integrations":{"amplitude":{"apiKey":"38803036884a752b104ee4bf501e0945"},"cookies":{"key":"rive_analytics","value":"granted"}},"contextual":{"options":["copy","view","chatgpt","claude"],"display":"header"},"variables":{"runtimeCurrentNameApple":"New Runtime","runtimeLegacyNameApple":"Legacy Runtime","monthlyCreditsVoyager":"$20","monthlyCreditsEnterprise":"$40","pricingCadetMonthly":"$17","pricingCadetYearly":"$108","pricingVoyagerMonthly":"$49","pricingVoyagerYearly":"$384","pricingEnterpriseYearly":"$1,440","cliAllowanceFree":"50","cliAllowanceCadet":"500","cliAllowanceVoyager":"5,000","versionWeb":"2.40.1","versionReact":"4.33.0","versionApple":"6.24.0","versionAndroid":"11.9.2","versionReactNative":"0.5.5","versionFlutter":"0.14.11","versionDevFlutter":"0.15.0-dev.4","versionUnity":"0.4.5","versionUnreal":"0.4.25","supportForm":"https://forms.rive.app/support?utm_medium=support_page","supportFormEducational":"https://forms.rive.app/education?utm_medium=support_page"},"styling":{"latex":true},"navigation":{"pages":[]}},"deployment":{"deploymentMetadataValue":{"subdomain":"rive","hasAudioNarration":false,"actualSubdomain":"rive","customDomains":["rive.app"],"gitSource":{"type":"github","owner":"rive-app","repo":"rive-docs","deployBranch":"main","contentDirectory":"","isPrivate":false,"mountPath":"","label":""},"chroma":{"liveDeploymentHistoryId":"6aecc69dc6ee43bd9a030ee4","collectionId":"9fe0a221-f3e5-455d-8b17-45fd5abbfbb1","schemaVersion":"v3","latestBuiltDeploymentHistoryId":"6aecc69dc6ee43bd9a030ee4"},"feedback":{"edits":true,"issues":true,"thumbs":true},"entitlements":{"AI_CHAT":{"status":"ENABLED"},"REMOVE_BRANDING":{"status":"ENABLED"},"WEB_MCP":{"status":"ENABLED"},"NARRATION":{"status":"ENABLED"}},"buildId":"6aee68270b65ceb1ec8d6262","clientVersion":"0.0.4076","searchFilterCounts":[{"language":"default","tag":"Runtimes","count":279},{"language":"default","tag":"Scripting","count":188},{"language":"default","tag":"Scripting API","count":167},{"language":"default","tag":"Editor","count":100},{"language":"default","tag":"Fundamentals","count":64},{"language":"default","tag":"GPU","count":45},{"language":"default","tag":"Design","count":32},{"language":"default","tag":"Artboards","count":25},{"language":"default","tag":"Interfaces","count":24},{"language":"default","tag":"Advanced Topics","count":22}]},"assistantConfig":{},"basePath":"/docs","hasChatPermissions":false,"hasWebMcpPermissions":true,"toggles":[{"name":"kill-isr","enabled":true,"variant":{"name":"disabled","enabled":false,"feature_enabled":true},"impressionData":false},{"name":"agent-mintlify-slack","enabled":true,"variant":{"name":"disabled","enabled":false,"feature_enabled":true},"impressionData":false},{"name":"agent-integrations-settings","enabled":true,"variant":{"name":"disabled","enabled":false,"feature_enabled":true},"impressionData":false},{"name":"rbac-expansion","enabled":true,"variant":{"name":"disabled","enabled":false,"feature_enabled":true},"impressionData":false},{"name":"automations-pr-grouping","enabled":true,"variant":{"name":"disabled","enabled":false,"feature_enabled":true},"impressionData":false},{"name":"custom-prefix","enabled":true,"variant":{"name":"disabled","enabled":false,"feature_enabled":true},"impressionData":false},{"name":"analytics-v7","enabled":true,"variant":{"name":"disabled","enabled":false,"feature_enabled":true},"impressionData":false},{"name":"user-flows-analytics","enabled":true,"variant":{"name":"disabled","enabled":false,"feature_enabled":true},"impressionData":false},{"name":"no-publish-flow","enabled":true,"variant":{"name":"disabled","enabled":false,"feature_enabled":true},"impressionData":false},{"name":"workos-onboarding","enabled":true,"variant":{"name":"disabled","enabled":false,"feature_enabled":true},"impressionData":false},{"name":"llms-txt-v2","enabled":true,"variant":{"name":"disabled","enabled":false,"feature_enabled":true},"impressionData":false},{"name":"snapshot-serving-live","enabled":true,"variant":{"name":"disabled","enabled":false,"feature_enabled":true},"impressionData":false},{"name":"stripTemperatureMiddleware","enabled":true,"variant":{"name":"disabled","enabled":false,"feature_enabled":true},"impressionData":false},{"name":"support-platform-pylon-zendesk","enabled":true,"variant":{"name":"disabled","enabled":false,"feature_enabled":true},"impressionData":false},{"name":"snapshot-serving","enabled":true,"variant":{"name":"disabled","enabled":false,"feature_enabled":true},"impressionData":false},{"name":"instant-rollback","enabled":true,"variant":{"name":"disabled","enabled":false,"feature_enabled":true},"impressionData":false},{"name":"granular-notifications-server","enabled":true,"variant":{"name":"disabled","enabled":false,"feature_enabled":true},"impressionData":false},{"name":"granular-notifications","enabled":true,"variant":{"name":"disabled","enabled":false,"feature_enabled":true},"impressionData":false},{"name":"automations-fable","enabled":true,"variant":{"name":"disabled","enabled":false,"feature_enabled":true},"impressionData":false},{"name":"fixed-ai-action-pricing","enabled":true,"variant":{"name":"disabled","enabled":false,"feature_enabled":true},"impressionData":false},{"name":"automation-resolve-merge-conflict","enabled":true,"variant":{"name":"disabled","enabled":false,"feature_enabled":true},"impressionData":false},{"name":"scoped-publishing","enabled":true,"variant":{"name":"disabled","enabled":false,"feature_enabled":true},"impressionData":false},{"name":"mintql","enabled":true,"variant":{"name":"disabled","enabled":false,"feature_enabled":true},"impressionData":false},{"name":"page-level-analytics","enabled":true,"variant":{"name":"disabled","enabled":false,"feature_enabled":true},"impressionData":false},{"name":"editor-version-history-v2","enabled":true,"variant":{"name":"disabled","enabled":false,"feature_enabled":true},"impressionData":false},{"name":"billing-page-v2","enabled":true,"variant":{"name":"disabled","enabled":false,"feature_enabled":true},"impressionData":false},{"name":"full-page-search","enabled":true,"variant":{"name":"disabled","enabled":false,"feature_enabled":true},"impressionData":false},{"name":"workspace-projects","enabled":true,"variant":{"name":"disabled","enabled":false,"feature_enabled":true},"impressionData":false},{"name":"assistant-v5","enabled":true,"variant":{"name":"disabled","enabled":false,"feature_enabled":true},"impressionData":false},{"name":"fork-pr-previews","enabled":true,"variant":{"name":"disabled","enabled":false,"feature_enabled":true},"impressionData":false},{"name":"revalidation-jwt","enabled":true,"variant":{"name":"disabled","enabled":false,"feature_enabled":true},"impressionData":false},{"name":"workos-sso-scim","enabled":true,"variant":{"name":"disabled","enabled":false,"feature_enabled":true},"impressionData":false},{"name":"hobby-abuse-scan","enabled":true,"variant":{"name":"disabled","enabled":false,"feature_enabled":true},"impressionData":false},{"name":"dashboard-inbox","enabled":true,"variant":{"name":"disabled","enabled":false,"feature_enabled":true},"impressionData":false},{"name":"workos-signup","enabled":true,"variant":{"name":"disabled","enabled":false,"feature_enabled":true},"impressionData":false},{"name":"turbopuffer-dual-write","enabled":true,"variant":{"name":"disabled","enabled":false,"feature_enabled":true},"impressionData":false},{"name":"workos-enabled","enabled":true,"variant":{"name":"disabled","enabled":false,"feature_enabled":true},"impressionData":false},{"name":"approve-review-flow","enabled":true,"variant":{"name":"disabled","enabled":false,"feature_enabled":true},"impressionData":false},{"name":"editor-metadata","enabled":true,"variant":{"name":"disabled","enabled":false,"feature_enabled":true},"impressionData":false},{"name":"sso-setup-deadline-banner","enabled":true,"variant":{"name":"disabled","enabled":false,"feature_enabled":true},"impressionData":false},{"name":"turbopuffer-serve","enabled":true,"variant":{"name":"disabled","enabled":false,"feature_enabled":true},"impressionData":false},{"name":"live-agents","enabled":true,"variant":{"name":"disabled","enabled":false,"feature_enabled":true},"impressionData":false},{"name":"comment-mode","enabled":true,"variant":{"name":"disabled","enabled":false,"feature_enabled":true},"impressionData":false}],"googleFontsInlined":false},"customCss":[{"filePath":"custom.css","content":"p{font-size:14px}ul li{font-size:14px}ol li{font-size:14px}.signature .code-block{border:none}.signature .code-block [data-floating-buttons=\"true\"]{display:none}.signature .code-block [data-component-part=\"code-block-root\"]{background:none;padding:0}.dark .card{background-color:var(--background-dark)!important;border-color:rgb(255 255 255 / 0.1)!important}.dark .card:hover{border-color:var(--primary-light)!important}"}],"page":{"pagePath":"editor/manipulating-shapes/joysticks","slug":"/editor/manipulating-shapes/joysticks","pageMetadata":{"title":"Joysticks","description":"Create reusable controls for complex animations","href":"/editor/manipulating-shapes/joysticks"},"description":{"compiledSource":"\"use strict\";\nconst {jsx: _jsx} = arguments[0];\nconst {useMDXComponents: _provideComponents} = arguments[0];\nfunction _createMdxContent(props) {\n const _components = {\n p: \"p\",\n ..._provideComponents(),\n ...props.components\n };\n return _jsx(_components.p, {\n children: \"Create reusable controls for complex animations\"\n });\n}\nfunction MDXContent(props = {}) {\n const {wrapper: MDXLayout} = {\n ..._provideComponents(),\n ...props.components\n };\n return MDXLayout ? _jsx(MDXLayout, {\n ...props,\n children: _jsx(_createMdxContent, {\n ...props\n })\n }) : _createMdxContent(props);\n}\nreturn {\n default: MDXContent\n};\n","frontmatter":{},"scope":{}},"pageType":"default","mdx":{"mdxSource":{"compiledSource":"\"use strict\";const{Fragment:_Fragment,jsx:_jsx,jsxs:_jsxs}=arguments[0];const{useMDXComponents:_provideComponents}=arguments[0];const YouTube=({id,timestamp})=>{const videoSrc=timestamp?`https://www.youtube.com/embed/${id}?start=${timestamp}`:`https://www.youtube.com/embed/${id}`;return _jsx(`iframe`,{width:`100%`,height:`400`,src:videoSrc,title:`YouTube video player`,frameBorder:`0`,allow:`accelerometer; autoplay; clipboard-write; encrypted-media; gyroscope; picture-in-picture; web-share`,referrerPolicy:`strict-origin-when-cross-origin`,allowFullScreen:true})};function _createMdxContent(props){const _components={code:`code`,p:`p`,strong:`strong`,..._provideComponents(),...props.components},{Heading,OptimizedImage,Tip,_MdxComponentBoundary}=_components;if(!Heading)_missingMdxReference(`Heading`,true);if(!OptimizedImage)_missingMdxReference(`OptimizedImage`,true);if(!Tip)_missingMdxReference(`Tip`,true);if(!_MdxComponentBoundary)_missingMdxReference(`_MdxComponentBoundary`,true);return _jsxs(_Fragment,{children:[_jsx(_components.p,{children:`Joysticks let you control complex poses and deformations with a single handle. Use them to combine multiple animated properties into reusable controls, such as moving a character’s eyes and head together.`}),`\n`,_jsx(_components.p,{children:`Each joystick axis controls the playback position of an assigned timeline. Moving the handle scrubs through those timelines, and you can key its position to animate the resulting poses.`}),`\n`,_jsx(_MdxComponentBoundary,{name:`YouTube`,children:_jsx(YouTube,{id:`PvZYDAUnLXE`})}),`\n`,_jsx(Heading,{level:`2`,id:`creating-a-new-joystick`,children:`Creating a new Joystick`}),`\n`,_jsx(_components.p,{children:`To create a new joystick, either find the Joystick Tool in the Stage Controls Tool menu, or by hitting the J key. Once the tool is activated, click anywhere on the stage to add a new Joystick.`}),`\n`,_jsx(OptimizedImage,{src:`https://mintcdn.com/rive/T4qlKXLQPzjSafML/images/editor/manipulating-shapes/NewJoy.gif?s=4a107e7937ec3f5eb09c070df3a1d41e`,alt:`New Joy`,\"data-og-width\":`800`,width:`800`,\"data-og-height\":`461`,height:`461`,\"data-path\":`images/editor/manipulating-shapes/NewJoy.gif`,\"data-optimize\":`true`,\"data-opv\":`3`}),`\n`,_jsx(Tip,{children:_jsxs(_components.p,{children:[`If joysticks aren’t visible on the stage, open the `,_jsx(_components.strong,{children:`View Options`}),` menu and make sure `,_jsx(_components.strong,{children:`Joysticks`}),` is enabled.`]})}),`\n`,_jsx(Heading,{level:`2`,id:`joystick-properties`,children:`Joystick properties`}),`\n`,_jsx(_components.p,{children:`With the Joystick selected, you’ll see a number of properties that you can use in the Inspector.`}),`\n`,_jsx(Heading,{level:`3`,id:`handle`,children:`Handle`}),`\n`,_jsx(_components.p,{children:`The Handle X and Y property describes the position that the handle is currently in. You’ll notice that these properties update as you move the handle around the Joystick.`}),`\n`,_jsx(OptimizedImage,{src:`https://mintcdn.com/rive/T4qlKXLQPzjSafML/images/editor/manipulating-shapes/Handle.gif?s=9f6d5fc45690c528c5d5b6baa7e276c8`,alt:`Handle`,\"data-og-width\":`800`,width:`800`,\"data-og-height\":`461`,height:`461`,\"data-path\":`images/editor/manipulating-shapes/Handle.gif`,\"data-optimize\":`true`,\"data-opv\":`3`}),`\n`,_jsx(Heading,{level:`3`,id:`position`,children:`Position`}),`\n`,_jsx(_components.p,{children:`The position property describes the position of the Joystick on the stage.`}),`\n`,_jsx(Heading,{level:`3`,id:`size`,children:`Size`}),`\n`,_jsx(_components.p,{children:`The size property describes the size of the joystick. We can modify this property to fit our needs by making the joystick longer/shorter or wider/skinnier.`}),`\n`,_jsx(OptimizedImage,{src:`https://mintcdn.com/rive/T4qlKXLQPzjSafML/images/editor/manipulating-shapes/Height_Width.gif?s=57b0006e0c20bd96de85bf30626421ea`,alt:`Height Width`,\"data-og-width\":`800`,width:`800`,\"data-og-height\":`461`,height:`461`,\"data-path\":`images/editor/manipulating-shapes/Height_Width.gif`,\"data-optimize\":`true`,\"data-opv\":`3`}),`\n`,_jsx(Heading,{level:`3`,id:`origin`,children:`Origin`}),`\n`,_jsxs(_components.p,{children:[`The origin property sets which point of the joystick sits at its position. Values are relative to the joystick’s size: `,_jsx(_components.code,{children:`0, 0`}),` is the top-left corner, `,_jsx(_components.code,{children:`1, 1`}),` is the bottom-right corner, and the default `,_jsx(_components.code,{children:`0.5, 0.5`}),` is the center.`]}),`\n`,_jsxs(_components.p,{children:[`Changing the origin moves the joystick’s bounds around its position without changing how the handle maps to the assigned timelines. For example, set the origin to `,_jsx(_components.code,{children:`0, 0.5`}),` to make a slider extend to the right of its position instead of centering on it.`]}),`\n`,_jsx(Heading,{level:`3`,id:`draw-in-world-space`,children:`Draw in World Space`}),`\n`,_jsx(_components.p,{children:`This toggle tells the joystick whether the joystick will scale with the zoom level or not. This option is useful when we need the joystick to always stay the same size, relative to the artboard.`}),`\n`,_jsx(Heading,{level:`3`,id:`x-\u0026-y-dropdown`,children:`X \u0026 Y dropdown`}),`\n`,_jsx(_components.p,{children:`The X \u0026 Y dropdowns allow us to assign timelines to the different axis of the Joystick.`}),`\n`,_jsx(_components.p,{children:`For example, this timeline animates the 3D rotation of this ship. You’ll notice many keys, which would make reusing this animation within other animations tricky to achieve.`}),`\n`,_jsx(OptimizedImage,{src:`https://mintcdn.com/rive/T4qlKXLQPzjSafML/images/editor/manipulating-shapes/JoyTimeline.gif?s=fd9928246ab81b04bf72528ea88baa04`,alt:`Joy Timeline`,\"data-og-width\":`800`,width:`800`,\"data-og-height\":`461`,height:`461`,\"data-path\":`images/editor/manipulating-shapes/JoyTimeline.gif`,\"data-optimize\":`true`,\"data-opv\":`3`}),`\n`,_jsx(_components.p,{children:`When the timeline is assigned to the X axis of the Joystick, notice that the joystick becomes a slider that only allows you to move the handle in the X direction.`}),`\n`,_jsx(OptimizedImage,{src:`https://mintcdn.com/rive/T4qlKXLQPzjSafML/images/editor/manipulating-shapes/UseJoy.gif?s=79f6956b946ba7c545227914098f7ce0`,alt:`Use Joy`,\"data-og-width\":`800`,width:`800`,\"data-og-height\":`461`,height:`461`,\"data-path\":`images/editor/manipulating-shapes/UseJoy.gif`,\"data-optimize\":`true`,\"data-opv\":`3`}),`\n`,_jsx(_components.p,{children:_jsx(_components.strong,{children:`Invert Toggle`})}),`\n`,_jsx(_components.p,{children:`After you add a timeline to an axis, you’ll notice a toggle that appears next to it. This allows you to invert the direction that the joystick scrubs through the timeline.`}),`\n`,_jsx(OptimizedImage,{src:`https://mintcdn.com/rive/T4qlKXLQPzjSafML/images/editor/manipulating-shapes/InvertToggle.gif?s=2977a8a86602bb1fcdf4b7d89791dd39`,alt:`Invert Toggle`,\"data-og-width\":`800`,width:`800`,\"data-og-height\":`461`,height:`461`,\"data-path\":`images/editor/manipulating-shapes/InvertToggle.gif`,\"data-optimize\":`true`,\"data-opv\":`3`}),`\n`,_jsx(Heading,{level:`3`,id:`handle-source`,children:`Handle source`}),`\n`,_jsx(_components.p,{children:`The handle source allows you to constrain the position of the handle to another object’s position properties. Use the button, then select an object you’d like to use as the handle’s position source. This option is helpful when you want the mouse cursor to drive the joystick while the state machine is running.`}),`\n`,_jsx(OptimizedImage,{src:`https://mintcdn.com/rive/T4qlKXLQPzjSafML/images/editor/manipulating-shapes/HandleSource.gif?s=71f5ef7c523a46d39f2cbec063a9203f`,alt:`Handle Source`,\"data-og-width\":`800`,width:`800`,\"data-og-height\":`461`,height:`461`,\"data-path\":`images/editor/manipulating-shapes/HandleSource.gif`,\"data-optimize\":`true`,\"data-opv\":`3`})]})}function MDXContent(props={}){const{wrapper:MDXLayout}={..._provideComponents(),...props.components};return MDXLayout?_jsx(MDXLayout,{...props,children:_jsx(_createMdxContent,{...props})}):_createMdxContent(props)}return{YouTube,default:MDXContent};function _missingMdxReference(id,component){throw new Error(`Expected `+(component?`component`:`object`)+\" `\"+id+\"` to be defined: you likely forgot to import, pass, or provide it.\")}","frontmatter":{},"scope":{"config":{},"pageMetadata":{"title":"Joysticks","description":"Create reusable controls for complex animations","href":"/editor/manipulating-shapes/joysticks"}}},"mdxSourceWithNoJs":null,"noJsSplices":[[143,580,")=>null;function _cr"]]},"mdxExtracts":{"tableOfContents":[{"title":"Creating a new Joystick","slug":"creating-a-new-joystick","depth":2,"children":[]},{"title":"Joystick properties","slug":"joystick-properties","depth":2,"children":[{"title":"Handle","slug":"handle","depth":3,"children":[]},{"title":"Position","slug":"position","depth":3,"children":[]},{"title":"Size","slug":"size","depth":3,"children":[]},{"title":"Origin","slug":"origin","depth":3,"children":[]},{"title":"Draw in World Space","slug":"draw-in-world-space","depth":3,"children":[]},{"title":"X \u0026 Y dropdown","slug":"x-\u0026-y-dropdown","depth":3,"children":[]},{"title":"Handle source","slug":"handle-source","depth":3,"children":[]}]}],"codeExamples":{}},"jsLinks":["/docs/_mintlify/custom/rive/6157a238f0df2356/rive-init.js","/docs/_mintlify/custom/rive/f98a4b1fb6965efa/rive-consent.js"],"subdomain":"rive","siteName":"Rive","title":"Joysticks - Rive","navMaps":{"firstHrefInVersion":{},"firstHrefInLanguage":{}},"lastModified":"2026-10-22T17:28:27.729Z","originalFileLocation":"editor/manipulating-shapes/joysticks.mdx"},"headHtml":"\u003cscript data-mint-head>(function(){var d=document.documentElement,p=null;if(!p){try{p=localStorage.getItem(\"isDarkMode\")}catch(e){}if(p==='true')p='dark';else if(p==='false')p='light';if(p!=='light'\u0026\u0026p!=='dark'\u0026\u0026p!=='system')p=\"dark\"}var r=p==='system'?(matchMedia(\"(prefers-color-scheme: dark)\").matches?'dark':'light'):p;d.classList.remove(r==='dark'?'light':'dark');d.classList.add(r);d.setAttribute(\"data-theme-preference\",p)})();\u003c/script>\u003cmeta data-mint-head name=\"description\" content=\"Create reusable controls for complex animations\">\u003cmeta data-mint-head name=\"application-name\" content=\"Rive\">\u003cmeta data-mint-head name=\"generator\" content=\"Mintlify\">\u003clink data-mint-head rel=\"icon\" type=\"image/png\" sizes=\"192x192\" href=\"/docs/mintlify-assets/_mintlify/favicons/rive/QOppeg00QlFTw5Bu/_generated/favicon/android-chrome-192x192.png\" media=\"(prefers-color-scheme: light)\">\u003clink data-mint-head rel=\"apple-touch-icon\" type=\"image/png\" sizes=\"180x180\" href=\"/docs/mintlify-assets/_mintlify/favicons/rive/QOppeg00QlFTw5Bu/_generated/favicon/apple-touch-icon.png\">\u003clink data-mint-head rel=\"icon\" type=\"image/png\" sizes=\"16x16\" href=\"/docs/mintlify-assets/_mintlify/favicons/rive/QOppeg00QlFTw5Bu/_generated/favicon/favicon-16x16.png\" media=\"(prefers-color-scheme: light)\">\u003clink data-mint-head rel=\"icon\" type=\"image/png\" sizes=\"32x32\" href=\"/docs/mintlify-assets/_mintlify/favicons/rive/QOppeg00QlFTw5Bu/_generated/favicon/favicon-32x32.png\" media=\"(prefers-color-scheme: light)\">\u003clink data-mint-head rel=\"shortcut icon\" type=\"image/x-icon\" href=\"/docs/mintlify-assets/_mintlify/favicons/rive/QOppeg00QlFTw5Bu/_generated/favicon/favicon.ico\" media=\"(prefers-color-scheme: light)\">\u003clink data-mint-head rel=\"icon\" type=\"image/png\" sizes=\"192x192\" href=\"/docs/mintlify-assets/_mintlify/favicons/rive/QOppeg00QlFTw5Bu/_generated/favicon-dark/android-chrome-192x192.png\" media=\"(prefers-color-scheme: dark)\">\u003clink data-mint-head rel=\"icon\" type=\"image/png\" sizes=\"16x16\" href=\"/docs/mintlify-assets/_mintlify/favicons/rive/QOppeg00QlFTw5Bu/_generated/favicon-dark/favicon-16x16.png\" media=\"(prefers-color-scheme: dark)\">\u003clink data-mint-head rel=\"icon\" type=\"image/png\" sizes=\"32x32\" href=\"/docs/mintlify-assets/_mintlify/favicons/rive/QOppeg00QlFTw5Bu/_generated/favicon-dark/favicon-32x32.png\" media=\"(prefers-color-scheme: dark)\">\u003clink data-mint-head rel=\"shortcut icon\" type=\"image/x-icon\" href=\"/docs/mintlify-assets/_mintlify/favicons/rive/QOppeg00QlFTw5Bu/_generated/favicon-dark/favicon.ico\" media=\"(prefers-color-scheme: dark)\">\u003cmeta data-mint-head property=\"og:title\" content=\"Joysticks - Rive\">\u003cmeta data-mint-head property=\"og:description\" content=\"Create reusable controls for complex animations\">\u003cmeta data-mint-head property=\"og:site_name\" content=\"Rive\">\u003cmeta data-mint-head property=\"og:url\" content=\"https://rive.app/docs/editor/manipulating-shapes/joysticks\">\u003cmeta data-mint-head property=\"og:type\" content=\"website\">\u003cmeta data-mint-head property=\"og:image\" content=\"https://rive.mintlify.site/docs/_mintlify/api/og/v2?division=Rigging+%26+Control\u0026amp;title=Joysticks\u0026amp;description=Create+reusable+controls+for+complex+animations\u0026amp;theme=9d194ea41709afb0505e42e9\u0026amp;signature=d6ba85f61f7ef696be687d8a98cf8a67e97faf30cde6b6f69f5129cae6eab7f5\">\u003cmeta data-mint-head property=\"og:image:width\" content=\"1200\">\u003cmeta data-mint-head property=\"og:image:height\" content=\"630\">\u003cmeta data-mint-head name=\"twitter:card\" content=\"summary_large_image\">\u003cmeta data-mint-head name=\"twitter:title\" content=\"Joysticks - Rive\">\u003cmeta data-mint-head name=\"twitter:description\" content=\"Create reusable controls for complex animations\">\u003cmeta data-mint-head name=\"twitter:image\" content=\"https://rive.mintlify.site/docs/_mintlify/api/og/v2?division=Rigging+%26+Control\u0026amp;title=Joysticks\u0026amp;description=Create+reusable+controls+for+complex+animations\u0026amp;theme=9d194ea41709afb0505e42e9\u0026amp;signature=d6ba85f61f7ef696be687d8a98cf8a67e97faf30cde6b6f69f5129cae6eab7f5\">\u003cmeta data-mint-head name=\"twitter:image:width\" content=\"1200\">\u003cmeta data-mint-head name=\"twitter:image:height\" content=\"630\">\u003cmeta data-mint-head name=\"msapplication-config\" content=\"/docs/mintlify-assets/_mintlify/favicons/rive/QOppeg00QlFTw5Bu/_generated/favicon/browserconfig.xml\">\u003cmeta data-mint-head name=\"apple-mobile-web-app-title\" content=\"Rive\">\u003cmeta data-mint-head name=\"msapplication-TileColor\" content=\"#ffa41c\">\u003clink data-mint-head rel=\"canonical\" href=\"https://rive.app/docs/editor/manipulating-shapes/joysticks\">\u003clink data-mint-head rel=\"alternate\" type=\"application/xml\" href=\"/docs/sitemap.xml\">\u003clink data-mint-head rel=\"alternate\" type=\"text/markdown\" href=\"/docs/editor/manipulating-shapes/joysticks.md\">\u003cscript data-mint-head type=\"application/ld+json\">{\"@context\":\"https://schema.org\",\"@graph\":[{\"@type\":\"Organization\",\"@id\":\"https://rive.app/#organization\",\"name\":\"Rive\",\"url\":\"https://rive.app\",\"logo\":{\"@type\":\"ImageObject\",\"url\":\"https://mintcdn.com/rive/tBktbqSaEr9ZwywZ/logo/rive_top_logo_black.svg?fit=max\u0026auto=format\u0026n=tBktbqSaEr9ZwywZ\u0026q=85\u0026s=e09b8659935986a837947ae7c3b104e0\"}},{\"@type\":\"WebSite\",\"@id\":\"https://rive.app/docs#website\",\"name\":\"Rive\",\"url\":\"https://rive.app/docs\",\"publisher\":{\"@id\":\"https://rive.app/#organization\"}},{\"@type\":\"WebPage\",\"@id\":\"https://rive.app/docs/editor/manipulating-shapes/joysticks#webpage\",\"url\":\"https://rive.app/docs/editor/manipulating-shapes/joysticks\",\"name\":\"Joysticks\",\"description\":\"Create reusable controls for complex animations\",\"dateModified\":\"2026-10-22T17:28:27.729Z\",\"isPartOf\":{\"@id\":\"https://rive.app/docs#website\"},\"breadcrumb\":{\"@id\":\"https://rive.app/docs/editor/manipulating-shapes/joysticks#breadcrumb\"}},{\"@type\":\"BreadcrumbList\",\"@id\":\"https://rive.app/docs/editor/manipulating-shapes/joysticks#breadcrumb\",\"itemListElement\":[{\"@type\":\"ListItem\",\"position\":1,\"name\":\"Advanced Topics\",\"item\":\"https://rive.app/docs/editor/ai-agent/ai-agent\"},{\"@type\":\"ListItem\",\"position\":2,\"name\":\"Rigging \u0026 Control\",\"item\":\"https://rive.app/docs/editor/manipulating-shapes/manipulating-shapes\"},{\"@type\":\"ListItem\",\"position\":3,\"name\":\"Joysticks\",\"item\":\"https://rive.app/docs/editor/manipulating-shapes/joysticks\"}]},{\"@type\":[\"Article\",\"TechArticle\"],\"@id\":\"https://rive.app/docs/editor/manipulating-shapes/joysticks#article\",\"headline\":\"Joysticks\",\"name\":\"Joysticks\",\"description\":\"Create reusable controls for complex animations\",\"url\":\"https://rive.app/docs/editor/manipulating-shapes/joysticks\",\"mainEntityOfPage\":{\"@id\":\"https://rive.app/docs/editor/manipulating-shapes/joysticks#webpage\"},\"dateModified\":\"2026-10-22T17:28:27.729Z\",\"publisher\":{\"@id\":\"https://rive.app/#organization\"},\"isPartOf\":{\"@id\":\"https://rive.app/docs#website\"}}]}\u003c/script>","siteName":"Rive","nav":{"global":null,"tabs":[{"tab":"Home","pages":[{"title":"Home","href":"/getting-started/introduction"}]},{"tab":"Editor","groups":[{"group":" ","pages":[{"title":"Using the Rive Editor","sidebarTitle":"Get Rive","href":"/editor/get-rive"},{"group":"Editor Interface","pages":[{"title":"Interface Overview","sidebarTitle":"Overview","href":"/editor/interface-overview/overview"},{"title":"File Browser","href":"/editor/interface-overview/file-browser"},{"title":"Viewport","href":"/editor/interface-overview/stage"},{"title":"Toolbar","href":"/editor/interface-overview/toolbar"},{"title":"Sidebar","href":"/editor/interface-overview/sidebar"},{"title":"Inspector","href":"/editor/interface-overview/inspector"},{"title":"Debug Panel","href":"/editor/interface-overview/debug-panel"}]},{"group":"Workflows","pages":[{"title":"Selection and Navigation","href":"/editor/interface-overview/selection-and-navigation"},{"title":"Keyboard Shortcuts","href":"/editor/keyboard-shortcuts"},{"title":"Dependencies Graph","href":"/editor/workflows/dependency-graph"},{"title":"Tagging","href":"/editor/tagging"},{"title":"Revision History","href":"/editor/fundamentals/revision-history"},{"title":"Best Practices","href":"/getting-started/best-practices"}]}]},{"group":"Fundamentals","pages":[{"group":"Design","pages":[{"title":"Artboards","href":"/editor/fundamentals/artboards"},{"title":"Components","href":"/editor/fundamentals/components"},{"group":"Drawing","pages":[{"title":"Shapes and Paths Overview","href":"/editor/fundamentals/shapes-and-paths-overview"},{"title":"Shape Tools","href":"/editor/fundamentals/procedural-shapes"},{"title":"Shape Builder","href":"/editor/design/shape-builder"},{"title":"Pen Tool Overview","href":"/editor/fundamentals/pen-tool-overview"},{"title":"Freehand Drawing with Pencil, Brush, and Eraser","sidebarTitle":"Freehand Drawing","href":"/editor/design/freehand-drawing"},{"title":"Fill and Stroke","href":"/editor/fundamentals/fill-and-stroke"},{"title":"Edit Vertices","href":"/editor/fundamentals/edit-vertices"},{"title":"Bucket Tool","sidebarTitle":"Bucket","href":"/editor/design/bucket-tool"},{"title":"Shape Bend Tool","href":"/editor/design/shape-bend-tool"},{"title":"Trim Path","href":"/editor/manipulating-shapes/trim-path"},{"title":"Clipping","href":"/editor/manipulating-shapes/clipping"}]},{"title":"Align and Distribute","href":"/editor/fundamentals/align-and-distribute"},{"group":"Text","pages":[{"title":"Text","sidebarTitle":"Overview","href":"/editor/text/text-overview"},{"title":"Text Runs","href":"/editor/text/text-runs"},{"title":"Text Styles","href":"/editor/text/text-styles"},{"title":"Text Modifiers","href":"/editor/text/text-modifiers"},{"title":"Text Input","href":"/editor/text/text-input"}]},{"group":"Hierarchical Relationships","pages":[{"title":"Hierarchy","href":"/editor/interface-overview/hierarchy"},{"title":"Groups","href":"/editor/fundamentals/groups"},{"title":"Solos","href":"/editor/manipulating-shapes/solos"},{"title":"Transform Spaces","href":"/editor/fundamentals/transform-spaces"},{"title":"Freeze and Origin","href":"/editor/fundamentals/freeze-and-origin"},{"title":"Animating Draw Order","sidebarTitle":"Custom Draw Order","href":"/editor/animate-mode/animating-draw-order"}]},{"group":"Responsive Design","pages":[{"title":"Overview","sidebarTitle":"Layouts Overview","href":"/editor/layouts/layouts-overview"},{"title":"Tools","sidebarTitle":"Tools","href":"/editor/layouts/layout-tools"},{"title":"Parameters","href":"/editor/layouts/layout-parameters"},{"title":"Component Sizing","href":"/editor/layouts/component-sizing"},{"title":"Layout Animation","href":"/editor/layouts/layout-animation"},{"title":"N-Slicing","href":"/editor/layouts/n-slicing"}]},{"title":"Rulers \u0026 Guides","href":"/editor/design/rulers-and-guides"}]},{"group":"Assets","pages":[{"title":"Assets","sidebarTitle":"Overview","href":"/editor/fundamentals/assets-overview"},{"title":"SVG \u0026 Vector Assets","href":"/editor/assets/svg"},{"title":"Photoshop Files","href":"/editor/assets/psd"},{"title":"Font Assets","href":"/editor/text/fonts"},{"title":"Audio Assets","href":"/editor/assets/audio"},{"title":"Libraries","sidebarTitle":"Libraries","href":"/editor/libraries"}]},{"group":"Animation","pages":[{"title":"Animate Mode Overview","sidebarTitle":"Overview","href":"/editor/animate-mode/animate-mode-overview"},{"title":"Timeline","href":"/editor/animate-mode/timeline"},{"title":"Keys","href":"/editor/animate-mode/keys"},{"title":"Interpolation (Easing)","href":"/editor/animate-mode/interpolation-easing"}]},{"group":"Interaction","pages":[{"group":"State Machines","pages":[{"title":"State Machine Overview","sidebarTitle":"Overview","href":"/editor/state-machine/state-machine"},{"title":"States","href":"/editor/state-machine/states"},{"title":"Transitions","href":"/editor/state-machine/transitions"},{"title":"Layers","href":"/editor/state-machine/layers"}]},{"title":"Listeners","href":"/editor/state-machine/listeners"},{"group":"Events","pages":[{"title":"Events Overview","sidebarTitle":"Overview","href":"/editor/events/overview"},{"title":"Open URL Events","href":"/editor/events/open-url-events"},{"title":"Audio Events","href":"/editor/events/audio-events"}]}]},{"group":"Data","pages":[{"title":"Data Binding Overview","href":"/editor/data-binding/overview"},{"title":"View Models \u0026 Instances","href":"/editor/data-binding/view-models"},{"title":"View Model Properties","href":"/editor/data-binding/property-types"},{"title":"Binding Data","href":"/editor/data-binding/binding-data"},{"title":"Controlling Data","href":"/editor/data-binding/controlling-data"},{"group":"Advanced Data Binding","pages":[{"title":"Enums","href":"/editor/data-binding/enums"},{"title":"Lists","href":"/editor/data-binding/lists"},{"title":"Converters","href":"/editor/data-binding/converters"},{"title":"Stateful Components","href":"/editor/data-binding/stateful-components"},{"title":"Property Groups","href":"/editor/data-binding/property-groups"},{"title":"Migration Guide","href":"/editor/data-binding/migration-guide"}]}]},{"group":"Publishing","pages":[{"title":"Exporting for Runtime","href":"/editor/exporting/exporting-for-runtime"},{"title":"Sharing \u0026 Embedding","href":"/editor/embed-urls/overview"},{"title":"Exporting Videos \u0026 Images","href":"/editor/exporting/exporting-for-video-and-static-design"},{"title":"Exporting for Backup","href":"/editor/exporting/exporting-for-backup"}]}]},{"group":"Advanced Topics","pages":[{"group":"AI","pages":[{"title":"AI Agent","href":"/editor/ai-agent/ai-agent"},{"title":"Rive MCP Integration","sidebarTitle":"MCP Integration","href":"/editor/ai/mcp"}]},{"group":"Rigging \u0026 Control","pages":[{"title":"Manipulating Shapes Overview","sidebarTitle":"Overview","href":"/editor/manipulating-shapes/manipulating-shapes"},{"title":"Meshes","href":"/editor/manipulating-shapes/meshes"},{"title":"Bones","description":null,"href":"/editor/manipulating-shapes/bones"},{"title":"Joysticks","href":"/editor/manipulating-shapes/joysticks"},{"group":"Constraints","pages":[{"title":"Constraints Overview","sidebarTitle":"Overview","description":"Learn how to use constraints in Rive.","href":"/editor/constraints/constraints-overview"},{"title":"IK Constraint","href":"/editor/constraints/ik-constraint"},{"title":"Distance Constraint","href":"/editor/constraints/distance-constraint"},{"title":"Scale Constraint","href":"/editor/constraints/scale-constraint"},{"title":"Rotation Constraint","href":"/editor/constraints/rotation-constraint"},{"title":"Transform Constraint","href":"/editor/constraints/transform-constraint"},{"title":"Translation Constraint","href":"/editor/constraints/translation-constraint"},{"title":"Follow Path Constraint","href":"/editor/constraints/follow-path-constraint"},{"title":"Scroll Constraints","href":"/editor/constraints/scroll-constraint"}]}]},{"group":"Accessibility","pages":[{"title":"Semantics","href":"/editor/accessibility/semantics"},{"title":"Focus","href":"/editor/accessibility/focus"},{"title":"Reduced Motion","href":"/editor/accessibility/reduced-motion"}]},{"group":"Admin \u0026 Workspaces","pages":[{"group":"Workspaces","pages":[{"title":"Workspaces","sidebarTitle":"Overview","href":"/account-admin/workspaces/workspaces-overview"},{"title":"Managing Workspaces","href":"/account-admin/workspaces/managing-workspaces"},{"title":"Managing Workspace Members","sidebarTitle":"Workspace Members","href":"/account-admin/workspaces/managing-workspace-members"}]},{"title":"Bring Your Own S3 Bucket","href":"/account-admin/bring-your-own-bucket"}]},{"group":"Legacy Features","pages":[{"title":"Inputs","href":"/editor/state-machine/inputs"},{"title":"Events at Runtime","href":"/editor/events/general-events"}]}]}]},{"tab":"Scripting","pages":[{"title":"Scripting","href":"/scripting/getting-started"}]},{"tab":"Runtimes","pages":[{"title":"Runtimes","href":"/runtimes/getting-started"}]},{"tab":"CLI","pages":[{"title":"CLI","href":"/cli/overview"}]},{"tab":" ","pages":[{"title":" ","href":"/tutorials/learn-rive"}]},{"tab":" ","pages":[{"title":" ","href":"/community/support"}]}]},"basePath":"","title":"Joysticks - Rive","buildId":"dpl_ATnXPMW25DMPUr9VBw6kL6MfBt6T","deploymentId":"dpl_ATnXPMW25DMPUr9VBw6kL6MfBt6T","dynamics":["a74be98ba7"],"chunks":["zoom-image-lightbox-CypZe82l.js","lightbox-handle-r17bVUz3.js"]}